Implementing multiple action sheets from toolbar buttons with SwiftUI
SwiftUI allows you to very easily create action sheets, those slide up dialog’s that almost fill the screen in iOS. There are many different ways to create these but most have subtle side effects, from un-clickable toolbar buttons to un-dismissable sheets. In this article I’ll detail how to reliably create multiple toolbar buttons that display multiple action sheets with buttons to dismiss them.
We are using functionality that is part of SwiftUI 2 supported by iOS 14 and up. If you are targeting anything lower this will not work.
Creating the sheet views
We’ll create the action sheet views first to stop Xcode continually throwing errors about the views not existing when we create the main content view. We’ll create two views, one for Settings which just has a Done button and one for an Add which has the typical Cancel and Done buttons.
SettingsView
This is very straight forward, we create a NavigationView and give it a title. The toolbar has a single primaryAction ToolbarItem that dismisses the sheet. Notice that the toolbar is a modifier of the child of NavigationView, not the NavigationView itself.
AddView
This is a little more complex as we have two ToolbarItem’s. A cancel button with a placement of cancellationAction which just dismisses the sheet, and a Done button with a confirmationAction which will save your data and then dismiss the sheet. I’ve also added a little logic to disable the Done button if value is empty. For a real world implementation you can build out this condition to validate all your fields.
There is nothing particularly special about these two views, the very specific implementation to get these Done and Cancel toolbar buttons to actually dismiss the sheets happens in the main content view which we’ll create next.
Creating the main content view
When you need multiple sheets from buttons on a view there are many examples of adding separate .sheet modifiers to individual toolbar buttons. Whilst this works to display the sheet, if you are programatically dismissing the sheet with toolbar buttons using self.presentationMode.wrappedValue.dismiss() then this doesn’t work. The only way to dismiss the sheet is to swipe down on it, if you have a sheet like AddView where you need Done and Cancel buttons this isn’t going to be useful.
What we need is a single .sheet modifier to the parent that knows which sheet to display. To do this we’ll create an enum of the sheets and a @state to hold the active sheet. The enum must conform to Identifiable so we need to add a computed property id which returns the hash value. Within each toolbar item we’ll create a button that sets the active sheet state variable.
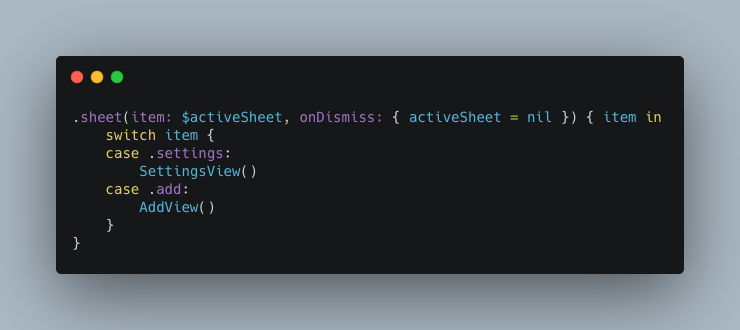
We can then add a single .sheet modifier with a switch statement to display the appropriate sheet based on the current state. Notice we also set the active sheet to nil within onDismiss to remove the currently active sheet.
Now when we run the code we’ll see two toolbar buttons for Settings and Add, tapping on those will open the relevant sheet and we can either slide down to dismiss the sheet or, more importantly tap the Cancel or Done buttons to properly dismiss the sheets.
With SwiftUI it’s extremely easy to create functional UI’s but small unexplainable restrictions make it frustrating at times. Hopefully this article has shown you how to solve a very common requirement that can easily stall your progress if you don’t know exactly where you should be putting your sheets.